Stacking a washer and dryer requires careful installation to ensure safety and proper functioning. Here are our instructions for stacking an LG washer and dryer. Keep in mind that specific models might have slight variations, so always refer to the user manual provided with your appliances for the most accurate instructions.
Materials You’ll Need:
- Stackable LG washer and dryer
- Stacking kit (27″ LG stacking kit and 29″ LG stacking kit on)
- Level
- Wrench or socket set (not all installs will require this)
- Screwdriver
- Helper (for lifting and positioning the appliances)
Instructions:
- Check Compatibility: Ensure that your LG washer and dryer models are compatible for stacking. The stacking kit might be designed specifically for certain models. Refer to your user manuals for compatibility information.
- Preparation & Leveling:
- Read the user manuals of both the washer and dryer thoroughly.
- Find a suitable location for the stacked appliances with proper ventilation, water, and electrical connections.
- Make sure the floor is level using a level and sturdy enough to support the stacked units.
- Important: At this time it is essential that the machine staying on the ground be leveled using the adjustable legs at each corner. It is much harder to do this after the appliances are stacked. LG also recommends to extend the same adjustable legs on the dryer (machine on top) so they are out as much as possible.
- Unpacking and Setup:
- Place appliances in the vicinity of the final location of install.
- Set up the washer and dryer individually according to their respective user manuals.
- Stacking:
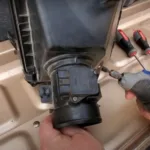
- Place the stacking kit (27″ LG stacking kit) on top of the bottom unit (in our case the washing machine) dryer, align it with the holes on the appliance’s back.
- Secure the stacking kit to the washer or dryer using the provided screws or fasteners.
- Stacking the Units:
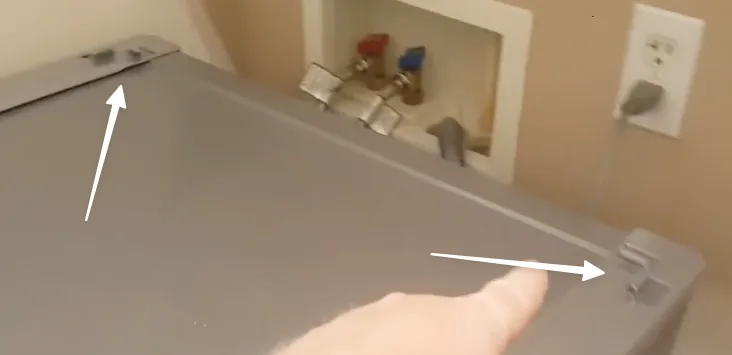
- With the help of a friend or family member, carefully lift the dryer onto the top of the washer. Make sure both units are properly aligned. Make sure the back feet slide into the bracket (2:44 minute mark in the video above). Also shown in the image below.
- Securing the Units:
- Place the 3rd piece over the front and fasten the front bracket in place using a screwdriver.
- Double Check the Leveling:
- Use a level to ensure that the stacked units are properly leveled. Adjust the leveling feet if necessary, hopefully they are already level and not rocking at all (stable flat even floor).
- Connections:
- Connect the washer and dryer to the appropriate electrical outlets, water supply, and drain as per the user manuals.
- Final Check:
- Ensure that all connections are secure and that there are no leaks, electrical issues, or instability.
- Test Run:
- Run a test cycle on both the washer and dryer to ensure they are functioning correctly and appear to be stable.
Your specific washer and dryer models might have variations in the installation process. Always consult the user manuals provided with your appliances and follow the manufacturer’s guidelines for safe and proper installation. If you’re unsure about any step, it’s recommended to contact LG customer support or seek professional assistance.
Part numbers used in the video is KSTK1 – link to product here