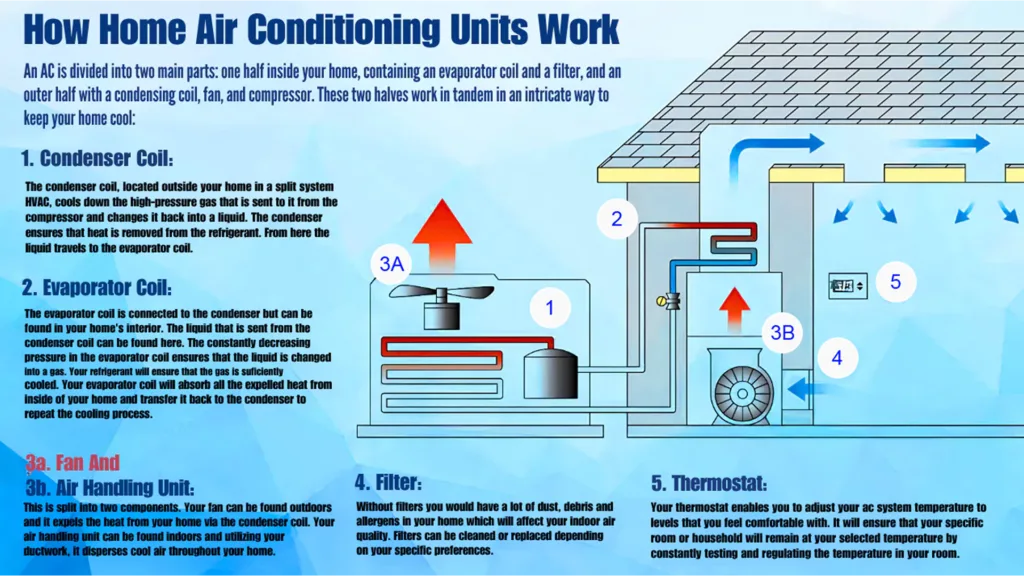
Maintaining your home’s HVAC system is essential for ensuring clean air and efficient operation. While replacing air filters every three months is widely recommended, there are additional steps homeowners should take to keep the system in top shape. One important task is cleaning the air return grills and their housings, which can accumulate dust and dirt over time, especially in dusty environments or homes with ceiling fans that circulate particles throughout the space.
To clean these components, it is best to remove the return grills from their ceiling mounts and take them outside. Using a strong hose nozzle, thoroughly rinse off dust and grime, then switch to a gentler spray to finish cleaning without splashing dirty water back onto the grills. After rinsing, place the grills in a shaded area to dry, and use a microfiber cloth to speed up the drying process if needed. Before reinstalling the grills, wipe down the inside of the housing with a damp microfiber towel to remove any residual dust.
Once the grills and housings are clean, install new air filters. Turning on the HVAC system during installation helps the filters fit snugly due to the suction. Marking the installation date on the filters and tracking maintenance in a spreadsheet can help keep a consistent schedule. Additionally, checking the backup batteries in your thermostat is a simple but often overlooked maintenance step. These batteries ensure the thermostat functions during power outages and should be replaced periodically to avoid failure.
Regular cleaning of ceiling fans is also recommended, as dust builds up on fan blades and can contribute to poor indoor air quality. Using a moist microfiber towel to wipe the blades helps maintain cleanliness. Furthermore, vacuuming and cleaning floors frequently reduces dust accumulation, easing the burden on HVAC filters and prolonging system life.
By following these annual deep cleaning tips for the indoor components of your HVAC system, you can improve air quality, enhance system efficiency, and extend the lifespan of your equipment. These proactive measures empower homeowners to save money and maintain a healthier living environment without relying on professional services.

DIY Instructions
- Prepare the area and gather needed tools. Place a stable ladder beneath each ceiling return you will service, collect replacement filters, a microfiber towel.
- Unclip or remove the return panel. Swing the panel down and disconnect any clips or attachments holding it in place; support the panel while releasing any retaining tabs to avoid dropping it. Lower the grill carefully to the ground or hand it to a helper to minimize impact and bending.
- Take grills outdoors and select the strongest hose nozzle setting. Use the high-pressure or concentrated spray to dislodge caked-on dust and grime, working from the clean side outward if possible to push debris away from the grille. Focus on seams and crevices where dust settles.
- Finish with a gentle rinse and avoid letting the grille sit in puddles. After the heavy spray, switch to a gentler nozzle to rinse away remaining residue; hold the grill off the ground while rinsing so dirty water does not splash back. Lay the grills flat in the shade to drip-dry and prevent warping or water spots.
- Moving back inside, wipe down the air return housing with a damp microfiber towel. Before installing the new filter, clean the inside edges and walls of the return housing to remove settled dust and lint that accumulate behind the grille.
- Install the new filters with the correct orientation and write the date on them. Insert filters following the airflow arrow printed on the frame.
- Reinstall the dry, cleaned grill into the housing. Reverse the removal steps, reattaching any clips or screws and ensuring the panel seals flush to the ceiling to minimize bypass. Confirm the grille is secure and does not rattle when the system operates.
- Next, check and replace thermostat backup batteries. Remove the thermostat from its wall base if required, locate the backup batteries, and replace them with fresh ones of the recommended type; test the unit to verify settings are preserved and indicators function. Record the battery change in your maintenance log.
- Clean ceiling fans and other dust reservoirs while you work. Wipe fan blades with a damp microfiber towel and rinse or launder the cloth as it becomes dirty to avoid redistributing dust. Pay special attention to fan blade leading edges where dust collects and later becomes airborne.
- Vacuum floors and high-dust areas after completing HVAC tasks. Removing settled dust from floors, ledges and upholstery reduces the rate of re-contamination of returns and extends filter life. Consider using a vacuum with a HEPA or high-efficiency filter for best results.
- Record the work in a maintenance log or spreadsheet. Note the date of filter installation, battery replacement, which returns were cleaned, and any observations (excess dust, difficulty removing grills, signs of moisture). Tracking maintenance builds a pattern that helps predict future needs and justifies professional service when anomalies appear.
- Dispose of old filters and store tools properly. Seal used disposable filters in a bag before discarding to contain dust, and stow hoses, nozzles, towels and ladders where they are ready for the next maintenance session. Schedule a reminder for the next filter change and annual deep clean.