Learn how to fix a hole in your roof’s underlayment and save hundreds of dollars by Doing It Yourself vs hiring a professional.
A lot of people don’t realize it but fixing a hole in your roof is possible with basic tools and a little knowledge. You don’t need some expensive power tools to get the job done… just a little bit of instruction and a couple common power tools will put you on the path to saving considerale amounts of money when it comes to fixing a leak in your home’s roof.
Check out the video below for a detailed breakdown on what is needed to diagnose and fix your roof leak – especially if it is caused by a hole in your underlayment. The video also shows you what tools and supplies are needed and how much it might cost you to DIY this job instead of hiring a professional roofing company.
Tools and Supplies Needed for Roof Repair
Tools – Here are a few of the must have tools to do this underlayment roof fix repair:
- 2 crowbars
Supplies – A number of items that cost us less than $50 to buy were:
- underlayment roll
- Grip Rite roofing nails (for underlayment)
- roofing nails (for battens)
- roofing silicon sealant (if tile cracks present)
Nice to Have tools – There were a couple tools that made things easier and nice but are not necessary. They are:
- shop vacuum (for cleaning area)
- ladder (maybe you can get to location without one – in our case we could through sliding window)
Nice to Have Supplies – There were a couple tools that made things easier and nice but are not necessary. They are:
- knee pad
- gloves
- eye protection (gamble cutting things without protection)
BIG Cost Savings when Fixing Roof DIY
Labor costs vary from different parts of the country. A union labor rate in New York might cost a lot more than non unionized rates in Arkansas so where you live makes a big difference but for us here in Arizona the typical rate of a roofer is around $150/hour.
A job like ours would likely be billed between 4-6 hours and cost about $1,000 even though it would only take a person or two around 1-2 hours to perform the roof repair.
For us it took under 2 hours. My father-in-law has done it a couple times before he might be a little faster than a first timer.
We used about $50 in materials… so we saved around $900 doing this repair ourselves.
Top 3 Tips
There are a few of tips we’d recommend sharing now having completing the leaky roof repair. Our top 3 are:
1. Roof Safety
Really important is to use proper safety equipment like wear appropriate safety gear, including non-slip shoes or shoes with good traction. Eye protection is a great idea when cutting battens or other parts of the roof with a power tool. Also, a safety harness is a good idea, some homes have D ring loops along the roof line to tie into to ensure you don’t fall off the roof. These anchor points can prevent falls especially on steep or slippery roofs. For us the roof pitch was mild, the traction was good, and the weather was nice which made it easier for us than some others may encounter.
2. Plan Ahead
Making a list and ensuring you have everything on the list will save a lot of time and risk associated with going up and down a ladder. Get everything squared away so when you go to do the job everything is ready. No extra trips to Home Depot or waiting for Amazon to deliver you something you forgot about is always a good idea. For every project I try to keep my trip count at the local hardware store to 1 but usually fail and have to go back once. The worst is when you screw up planning so bad that you have to go back several times, which is REALLY a problem when it isn’t 5 minutes from your house like it is from mine.
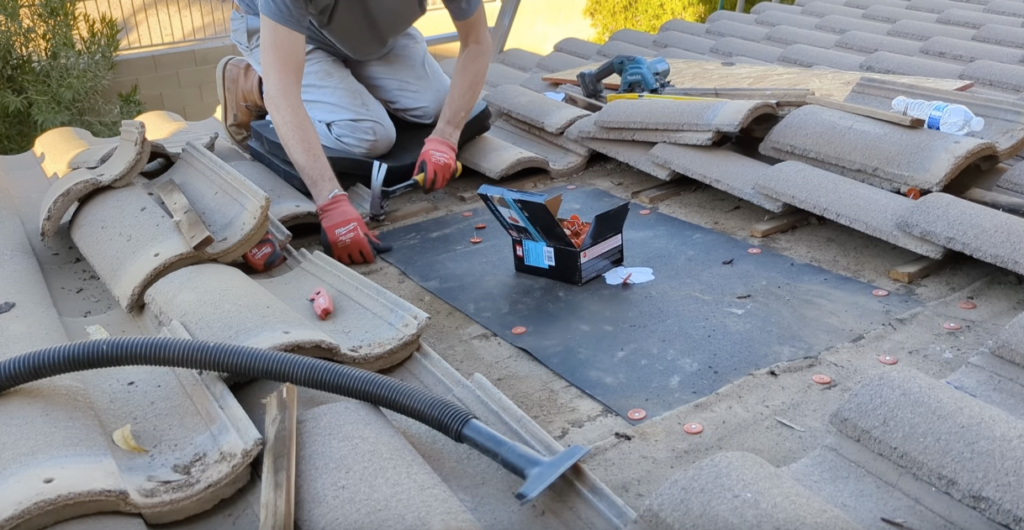
3. Clean and Inspect Carefully
Thoroughly clean the area around the hole in the underlayment. Remove any debris, dirt, or loose materials to ensure a clean surface for the repair – we did this with a shop vacuum. If the underlayment is damaged around the hole, cut away any compromised sections and replace them with the new underlayment material, in our case we placed a new mat over the top and nailed it down before replacing the roof tiles (see video for more details).