When water is low in the toilet bowl it often leads to needing to replace the internal components of a toilet, such as the fill valve and flush valve. When parts wear out they are unable to perform consistently and up to standard but spend a few dollars and a little of your time you’ll be back up and running like the toilet was brand new. I’ll provide you with a guide on how to replace these components while highlighting the exact things I did in my case.
Tools and Materials You May Need:
- Replacement Korky Complete fill valve and flush valve kit
- Adjustable wrench
- Screwdriver
- Channel locks
- Dremel
- Ruler and level
- Bucket and towels
- Plumbers tape or thread sealant
Steps for toilet water too low repair:
- Turn off the Water Supply: Locate the shut-off valve behind or near the toilet. Turn it clockwise (right) to shut off the water supply to the toilet. Using a pencil mark the water level in the top bowl.
- Flush the Toilet: Flush the toilet to drain as much water as possible from the tank. If the tank doesn’t empty completely, you can use a sponge or towel to soak up any remaining water. Next mark the level of the water after it has been flushed.
- Remove the Old Components:
- Disconnect the water supply line from the fill valve at the bottom of the tank using an adjustable wrench.
- Remove any remaining water from the tank using a sponge or towel.
- Unscrew the nut that holds the fill valve to the bottom of the tank. Remove the old fill valve.
- Disconnect the chain or lift rod that connects the flush lever to the flush valve.
- Unscrew the nut or bolts that hold the flush valve to the bottom of the tank. Remove the old flush valve.
- Remove sponge gasket and mounting nut with a large wrench. In my case I didn’t have a large enough wrench so I used a Dremel to cut the plastic nut off (2:22 minute mark in video above).
- Clean the tank now that all parts have been removed.
- Install the New Fill Valve:
- Follow the manufacturer’s instructions to install the new fill valve – see the video above for screenshots from the Korky Complete fill valve and flush valve kit. This involves inserting the fill valve into the hole at the bottom of the tank and securing it with the provided nut from below. Secure this hand tight.
- Next, attach the water supply line to the fill valve and tighten it with an adjustable wrench.
- Install the New Flush Valve:
- Insert the new flush valve into the hole at the bottom of the tank.
- Secure the flush valve with the provided nuts or bolts, and tighten them carefully.
- Reconnect the Chain or Lift Rod:
- Reattach the chain or lift rod to the flush lever on the new flush valve. Adjust the chain length if needed to ensure proper flushing.
- Turn On the Water Supply:
- Slowly turn on the water supply by turning the shut-off valve counterclockwise (left). Check for any leaks around the fill valve and flush valve connections.
- Adjust the Fill Level:
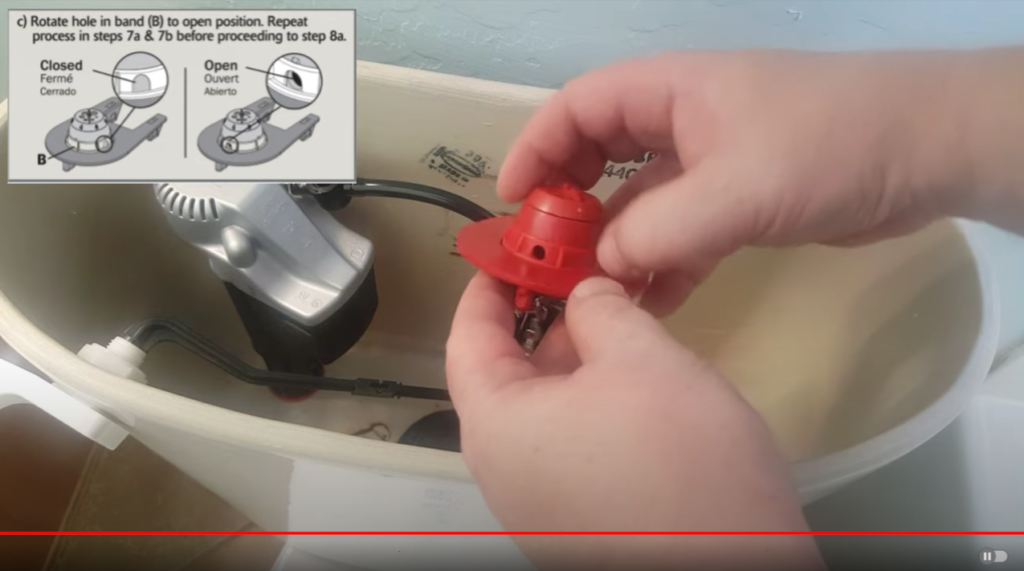
- Follow the manufacturer’s instructions (about 12 minute mark of my video above) to adjust the fill valve to the correct water level in the tank. This usually involves adjusting the height of the float or the red stopper (see bottom image below).
- Test and Check:
- Flush the toilet a few times to make sure everything is working properly.
- Check for any leaks around the new components and make any necessary adjustments.
If you encounter any difficulties or are unsure about any step, it’s a good idea to seek professional help but most of the time the Korky Complete fill valve and flush valve kit is a perfect DIY kit for your average go it yourself-er.